Shea butter is loaded with vitamins and fats, moisturizing your skin and hair. Thick and yellowish, the shea butter is able to liquefy at body temperature. It’s a product of the shea-karite tree and has a specific smell.
It has anti-inflammatory abilities and nourishes the scalp, helping your hair grow healthier and stronger.
Page Contents
- Is shea butter good for the hair?
- Does Shea butter work for hair growth?
- Shea butter benefits for the hair
- Is Shea butter good for hair loss?
- Is Shea butter good for natural hair?
- Shea butter for curly hair
- How to use shea butter on hair
- Shea butter hair masks- some useful recipes
- Raw shea butter for hair- is it better?
- Whipped shea butter
- Shea butter and coconut oil for hair growth
- African shea butter for hair
- Cantu shea butter for natural hair
Is shea butter good for the hair?
You may use shea butter for both your scalp and hair. Even if you don’t realize it, healthier scalp means healthy and stronger hair. When your scalp is irritated, dry or flaky, you may use shea butter for moisturizing the scalp and addressing various skin conditions. The healthier the scalp is, the better the chances for your hair to grow thicker and stronger.
You may also use shea butter directly on your hair strands for a good moisturizing, reducing the risk for breakage and dryness. Once your hair doesn’t break that easily, it’s going to look healthier and better altogether.
When you’re using shea butter on your scalp, you’re also helping your hair grow longer and healthier. You may use it as a styling cream, especially if your hair is curly or damaged. Keep in mind not to put it on the roots of your hair, as it can make your hair look dirty and greasy.
On the side note, shea butter should be avoided if you have tree nut allergies. Even if there are no clinical trials related to the shea butter and allergies, it’s better to have chat with your allergist before start using it.
Does Shea butter work for hair growth?
If you’re planning to help your hair grow thicker and longer, a mask made with shea butter, castor oil and coconut oil is going to be of great help anytime. The shea butter is always a solution when it comes to growing thicker and longer hair.
Sealing the moisture into a dry hair and soothing the itchy scalp, shea butter is also known for its ability to soften hair and boost the hair growth.
The build-up of DHT hormone in the scalp or the unfortunate hair products cause your scalp to irritate and itchy. The minute your scalp isn’t healthy anymore, your hair doesn’t grow thick and long anymore. Therefore, having a moisturizes and nourished scalp becomes essential for healthy hair growth.
Still can’t see it how does shea butter sustain the healthy growth of thinning hair? take a look at all the things that shea butter is able to do for your hair and scalp:
- It moisturizes and nourishes the dry scalp and strands
- It rejuvenates the weak and sleeping hair follicles, strengthening them
- It helps your hair grow thicker and shiny
- Add some rosemary essential oil if you’re experiencing hair loss. The list of oils that you can add to shea butter for reducing hair loss is very long and you need to try it for best results.
Shea butter benefits for the hair
There are many benefits that shea butter has for the hair and here are the most important ones:
- You can use it as massage oil for the scalp
When you’re massaging shea butter into your hair, it’s going to bring comfort to scalp too as it’s able to remove dandruff and solve the cradle cap in infants. You can use shea butter on dry and oily scalp alike. On the oily scalp, shea butter is going to control the excessive oil production by the skin glands. On the other hand, shea butter can also moisturize a dry scalp, reducing flaking caused by dryness.
Easy to wash, shea butter doesn’t leave your hair looking all greasy, but you do need to use it right. A small amount on the palm is going to be enough for each use. As the butter melts, dip the fingers from the other hand and apply it on the scalp, using gentle rubbing. The oil is going to absorb nice and easy. You only need to use it twice or three times of week for getting a healthier hair growth.
- It softens the hair
Another great thing about shea butter is that is puts frizz under control, making your hair easier to handle. You may coat your hair and massage it well into your scalp. If you’re applying it directly to your hair strands, shea butter is going to reduce the risk for drying and brittleness. It’s able to seal in moisture as it coats each strand of hair in a non-greasy and pretty thin layer of fat.
When applying it to the hair, get a teaspoonful of shea butter, rubbing it pretty well between your palms. The butter is going to melt pretty fast so you need to work fast. Spread it over a small section of your hair, but use both hands for the job. Continue to work in small sections until you’re done. Get a good brush and run it through your hair so that each and every strand of hair is well covered.
- It protects the hair from UVs and outer pollutants
Not everyone is going to start using shea butter on their hair on a regular basis. However, you can still take advantage of it right before you step out of your house. Take some shea butter, rub it between your palms and spread if over your hair. Shea butter has a broad-spectrum of SPF6 so it’s a great solution for protecting your hair from the sun’s UVs. Additionally, shea butter is going to protect the hair from the chemical pollutants too.
Even if the natural aroma of shea butter is a tad nutty or smoky, not everyone likes it. Keep that in mind when you’re thinking about using it on your hair or skin.
Is Shea butter good for hair loss?
Shea butter brings a lot of good things to the table and here’s why it’s going to help you when you’re dealing with hair loss:
- It nourishes
Loaded with vitamin A, E, F and K, shea butter creates a good support for a healthy hair growth. the nutrients that shea butter offers rejuvenate the hair follicles, boosting a nourished and well-hydrated hair to grow.
- It reduces inflammation
Shea butter is a strong anti-inflammatory agent as it contains cinnamon acid esters that minimize redness and calm the inflammation. The acid esters heal inflammation which leads to hair loss in various forms of scalp inflammation. Due to its anti-inflammatory ability, shea butter boosts the hair follicles, helping them stay healthy.
- It moisturizes
When your scalp is dry and you’re also dealing with dandruff, chances are you’re going to deal with hair loss sooner or later. Shea butter is a great moisturizer and it’s going to help you take care of your scalp. It’s rich in fatty acids, sealing moisture and hydrating skin and scalp.
- It acts like a heat protectant
Due to its 3-10 SPF broad spectrum, shea butter keeps sun away from the hair, coating the hair strand. When the sun gets to your hair strands, it also sucks up all the natural oils from hair, leading to dry and brittle hair. and that also means hair loss.
- It’s antioxidant
shea butter is loaded with strong antioxidants and vitamin E which helps your hair strands grow stronger. Vitamin E also keep the damage of free radicals under control and reduces the risk for hair loss.
Is Shea butter good for natural hair?
Apart from the previous benefits, shea butter is good for many other reasons for the well-being and the appearance of your natural hair. Loaded with fatty acids, vitamins and phytonutrients, shea butter nourishes the scalp in a natural way.
Here are some other performances of shea butter on hair:
- It locks in moisture
Shea butter isn’t going to moisture your hair, but it’s going to create a coat that seals in the present moisture. It’s a great ingredient to use on dull and fragile hair. This is why it’s a solid option for the curly and African-American hair, which are prone to drying and brittleness. Easily absorbed into the hair, shea butter moisturizes the hair so the best way to use it is to apply it on your wet/damp hair.
- It controls frizz
Coating the hair strands with a non-greasy and thin film, shea butter is going to put flyaway under control, leaving a healthy radiance on the hair and eliminating split ends. You only need a bit of it for putting the frizz under control.
- It keeps the scalp healthy
Highly concentrated in fatty acids and vitamins, shea butter is going to maintain the health of your scalp. It doesn’t just comfort the dry scalp, but it also works in various skin conditions such as eczema, psoriasis or itchy scalp. It doesn’t clog pores nor leaves the hair greasy and it’s so easy to wash it off later on.
Shea butter for curly hair
Taming the stubborn curls is no easy job and the way your day is going to go depends a lot on how you’re able to handle your curls early in the morning.
The solutions are many, but maybe you’d rather use a natural product and it seems that shea butter is quite the miracle worker when it comes to curly hair. After all, there’s no surprise whatsoever that God put the shea tree in a continent full of people with curly and kinky hair.
Loaded with nutrients, vitamins, antioxidants, fatty acids and minerals, shea butter benefits both the skin and hair. You can use it on your curly hair not only as a deep conditioner or a shampoo, but also as a hair moisturizer and hair growth oil.
People with curly and coarse hair should use shea butter as it acts like an emollient that seals in moisture, maintaining it inside the hair strand. Black hair is the driest hair type and it’s the texture to blame on that. Shea butter is able to minimize dryness, repairing the brittle and fragile curly hair. As you put shea butter on your curls, you’re going to create a protective barrier that helps the hair not to lose its moisture. Additionally, shea butter absorbs very fast into the hair strands and doesn’t leave a greasy feel to your curls. It doesn’t add unnecessary weight to your hair either.
It’s important to mention that shea butter doesn’t moisturize the hair per se, but it’s seals in the moisture that is already present. If you’re feeling your hair dry, simply applying shea butter isn’t going to cut it. By contrary, it’s going to make your hair even harder and drier. You need to wet your hair first and water is going to do it. This is why shea butter works best when applied on wet/damp hair, right after washing.
In order to get the best out of the shea butter, here are some tips to take under considerations when using it on your curly hair:
- Water evaporates from the hair between 4-7 days after washing. When you’re not washing and moisturizing enough your curls, not even the biggest amount of shea butter is going to help your hair when it comes to moisture loss or dullness. It’s better to develop a good hair care routine, using shea butter for moisturizing your hair before and after washing. Better yet, change to a sulfate-free shampoo for better results.
- Shea butter is still a hair butter/oil so it’s still going to act just like a sealant, creating a protective barrier between your hair and the outer stressors. In order to maintain your hair well moisturized, it’s better to not dry your hair completely. Keep in mind to rub in enough shea butter into your damp hair, sealing in moisture.
- No matter how great shea butter, it’s still not going to be able to work if you’re not drinking enough water or you’re not having a healthy diet. Keep an eye on your lifestyle, drinking and eating habits so that you get the best out of shea butter.
How to use shea butter on hair
Shea butter has plenty of benefits for the hair and you may use it in different ways, according to your needs.
Shea butter for hair growth
If you’re determined to boost the healthy growth of your hair, here is a popular recipe that is very easy to make from the comfort of your home. You’re also going to need castor and coconut oil for the recipe. Coconut oil is easily absorbed due to its molecular structure and it’s loaded with fatty acids (capric, lauric, caprylic mystiric and stearic acids are only some of them) that help the give the hair follicles the strength and nourishments they need. As for the castor oil, we all know by now that it’s quite the miracle worker when it comes to hair growth.
Here’s what you’re going to need:
- ½ cup of raw shea butter
- 2-6 tablespoons of castor oil
- 2 tablespoons of organic coconut oil
You may also add some essential oils, but it’s not mandatory:
- 1 tablespoon of rose water
- 5 drops of lemon grass essential oil
- 7 drops of rosemary essential oil
You should start by placing the shea butter in a large bowl. You need to get a silky consistency, so you’re going to have to whip it with a hand mixer for 30 seconds or so. Continue with adding the coconut oil, whipping again for 10 seconds. Work patiently and scrap down the sides with a good plastic spatula. Now it’s time to add the castor oil and the other ingredients, whipping the whole mixture for a couple of minutes. Make sure that all the ingredients are well incorporated, resulting into an airy white cream.
Put the mixture in your regular hair treatment container (assuming you already have one). You can also use it as a leave-in conditioner or style. Put it also on your scalp for boosting the hair follicles.
Shea butter for irritated scalp and dandruff
Whether your scalp is struggling with dandruff, irritation or other health issues, shea butter is going to help you solve the problems in a natural way.
Shea butter is able to comfort the itchy scalp, while moisturizing it and preventing future damage. The scalp absorbs fast and easy shea butter, which explains why we use it for so many skin and hair related problems.
You don’t need to apply raw shea butter over your scalp. You should heat it first and only afterwards apply it nice over your scalp. Use a circular motion for better absorption.
Get creative and add tea tree oil in melted shea butter and massage your scalp with the mixture. You’re going to feel the soothing effect of the mixture right away. The mixture works for both dry and oily scalp.
You only need to use shea butter for 2-3 times a week, in order to get rid of dandruff. You may also add a carrier oil (olive or coconut oil are going to do it). Apply the resulted mask on your tresses and let it work for 30 minutes.
Shea butter for controlling the frizz
One of the common problems out there is definitely the frizz and flyaways. Shea butter is a great choice for putting frizz under control, making your hair easier to handle. On the plus side, it’s not greasy, so it’s not going to leave a sticky feel to your hair.
You can use shea butter as it is, rubbing a bit of it between your palms. Once the shea butter is melted (which happens really fast), you only need to run your hands through your hair. You need to make sure that all strands are well covered so brush your hair afterwards.
Shea butter for hair protection
If you’re planning to go outside and you want to protect your hair from the damaging UVs, a thin layer of shea butter is going to keep the bad UVs away from your hair. Shea butter coats the hair strands and forms a protective barrier against the outer stressors.
It may sound surprising, but shea butter is strong enough to protect your hair against heat damage. You may use shea butter as it is or you can improve its performance by adding some avocado or grapeseed oil. You cannot use just any oil and you need one with high smoke point.
Work on small areas as you’re blowing dry or using the flat iron on your hair.
Shea butter for moisturizing the hair
Due to its non-greasy consistency, shea butter is also an amazing hair moisturizer. No matter if your hair is straight or curly, running some shea butter through your hair is going to moisturize your hair, leaving a shinier and beautiful feel to your hair.
Shea butter for better hair
Shea butter helps your hair grow faster, longer and thicker. It gives your hair a healthy radiance and softens it, at the same time. No matter your hair type, shea butter moisturizes your hair and protects it from outer stressors, UV’s including. Why not try it?
Shea butter hair masks- some useful recipes
Shea butter hair masks recipes are various and you know you’re going to help your hair on so many levels when using one.
As it’s practically impossible to cover all the combinations out there, we’re only going to take a closer look at two of them. Getting online and finding more versions is up to you and your hair needs, of course.
Shea butter& Cedarwood oil
In case this is rather new to you, cedarwood oil is an impressive remedy to use against hair loss. It’s able to stimulate the hair follicles and also to improve the blood flow to the scalp. Each and every single hair follicle is going to get the nutrients it needs for creating a healthier hair strand that and a stronger hair shaft.
Here’s what you’re going to need:
- 2 tablespoons of raw shea butter
- 5 drops of cedarwood oil
- 1 tablespoon oil
You need to put all the ingredients in an electric stand mixer and mix them until you obtain a soft white cream. Keep in mind to always scrape down the sides so that you mix well all the ingredients.
Once the mixing is done, transfer the mixture into a clean bowl and prepare your hair for the mask. Your hair should be clean and damp.
Use your clean finger tips for applying the mask on the scalp, making sure that you cover all of it. Use the rest of the mixture for your hair strands.
Get a soft cloth to cover your head and go to sleep. A cling film or a shower cap are going to work too. It’s better to protect your pillow case so cover it with an old towel. This way, no slip-ups from the shower cap are going to stain the pillow case.
Go ahead and wash your hair really well in the morning, using water and your regular shampoo. However, it’s better to use a sulfate-free shampoo, for making the hair mask all worth it. You may have to shampoo twice for cleaning the hair from all the oils.
Shea butter mask for hair growth
Even if you’re going to have to gather plenty of oils for this hair mask, if you’re the hair aficionada, you shouldn’t hesitate about trying it. You can use this hair mask daily, before styling your hair as you don’t just want to protect your hair, but also to help your hair grow thicker and healthier.
The hair mask is going to rejuvenate the hair follicles, leaving also a nice smell behind that isn’t going to fade away very fast. Here’s what it’s going to take:
- 1 cup of raw shea butter
- 1 tablespoon avocado oil
- 1 tablespoon jojoba oil
- ¼ cup of extra virgin coconut oil
- 10 drops of rosemary essential oil
- 15 drops of lavender essential oil
You should start by melting the shea butter together with the coconut oil. Use a double boiler for better results.
Once the mixture is all melted, you need to wait for it to cool down and place it in the refrigerator for 20 minutes and partially solidify. You need to whip it nice and easy later on.
Whip the mixture with your hand mixer until you get a creamy consistency for the mixture, scraping it down the side. Add the other ingredients and whip it so that everything it well combined. Put the new mixture into a clean container.
You may use this hair mask every single day on your hair instead of your daily moisturizer.
Raw shea butter for hair- is it better?
Not all shea butter products out there are made with raw shea butter. It’s up to you to decide which way to go, but it’s better to take a closer look at the raw shea butter before jumping to any conclusion.
- What is raw shea butter?
Unrefined (raw) shea butter is typically removed from the seeds by hand and this process sure takes a lot of time. As big as some walnuts, the seeds are boiled afterwards so the shells are going to be easier to remove. The process continues with the breaking of the boiled seeds, for opening the shells. All the pieces of broken shells are going to be removed as only the inner seed is going to be beaten with water. In order to extract the fat, the seeds are going to be boiled once again. As the fat cools, it’s going to be well whipped and turned into a smooth and easy to use product.
Raw shea butter is both unrefined and unfiltered, so it may contain some impurities. You may still filter it through some cheesecloth as you’re not going to reduce its overall quality.
- What are its benefits?
Unrefined shea butter works as a protective barrier against moisture loss, which makes it so dependable for cosmetics and soap. It reduces inflammation and prevents future skin infection or irritation. Even if the process of refining the shea butter is going to reduce these properties, shea butter still is an effective ingredient to look for within the formula of your cosmetics. Commercially refined shea butter may also contain chemicals and fragrances that raise the risk for irritation or allergies. It may also include fillers, which aren’t safe for your health.
As it contains no other ingredients, raw shea butter is great to use as it is on your hair. Able to help your hair grow stronger and thicker, cleansing and soothing the irritated scalp, raw shea butter is a great ingredient to use in your hair care regimen. You can use it on your way out to the market for protecting it against the sun’s damage or to apply it before heat styling your hair. It softens and detangles your hair, without leaving a greasy feel afterwards. If you’ve been dealing with dandruff, try the raw shea butter as a natural remedy too.
Pure and unrefined shea butter is non-comedogenic even if it’s loaded with oleic acid. It works for both oily and dry skin, but you should take it with a grain of salt when it comes to acne prone skin.
- How do you recognize it? How to store it?
Raw shea butter presents a beige or yellow color and it’s almost never white. As a matter of fact, its lack of color is a red flag for informing you that you’re getting refined shea butter.
The fatty acids within raw shea butter may turn rancid when stored for a long time or in the wrong temperature. Try to use it within 18 months of extraction for staying on the safe side.
Some don’t like using raw shea butter as it has a heavy and strong scent which sits on the “smokey” side. The smell tends to linger and may be strong even when combined with other ingredients.
Keep in mind that raw shea butter is a grainy product so it’s a bit tricky to keep it smooth.
Whipped shea butter
Great to use on both skin and hair, shea butter stands out with its abilities and challenges. It’s rather firm in its natural formal, but it’s not impossible to handle. You want to whip it first before taking it out of its container and applying it to the hair.
Shea butter works with many carrier ingredients and it’s important that you have the time and the patience to try various combinations. You’re going to need a carrier as it’s going to maintain the whipped shea butter from going hard back again. Once you whip it, you’re going to obtain a fluffy and highly moisturizing natural product that is quite the miracle worker for your hair.
Let’s go over the steps you need to take in order to be able to use whipped shea butter for your hair:
- The natural state
Shea butter is firm and thick in its natural state so you need to scoop it out of the jar. It’s better to place it in a metal or glass bowl.
- Get over the pot
Some may want to use the double-boiler method, so here it is. You need to place only a bit of water in a pot and bring it to boil. As water starts boiling, take it away from heat and put the shea butter bowl over the pot. You’re going to notice that shea butter starts melting pretty fast, so make sure you remove the pot from the heat the second you’re noticing the melting.
You don’t need to place the bowl over the hot water; some simply like to microwave the shea butter in a microwave-safe bowl. However, you may diminish the overall quality of the shea butter this way.
- Add the coconut oil
You need to remove the bowl from the pot and add only 1 tablespoon of coconut over the already melted shea butter. Make sure to mix them very well.
- The whipping
As the shea butter is well mixed with coconut oil, you can proceed with the whipping. Don’t worry if the shea butter isn’t melted entirely into a liquid. The whipping process is going to eliminate and break down all chunks of butter anyway.
- Check after 5 minutes
Get a regular hand-held mixer in the beginning of the whipping of the shea butter/coconut oil combination. It’s better to use a medium-to-fast speed. It shouldn’t take more than 5 minutes until the mixture gets liquid. It’s not a bad thing if you take short breaks any now and then.
- Check after 10 minutes
10 minutes of whipping is going to turn the mixture into a thicker mixture than a liquid. Even if the mixture isn’t firm yet, it shouldn’t be liquidly anymore either.
- Check after 20 minutes or more
It’s important to keep in mind that the larger the amount of shea butter, the longer it’s going to take you to be done with the whipping. After 20 minutes of whipping, the mixture is supposed to look a lot like meringue: thick, yet fluffy and light. The whole whipping process is increasing the volume of shea butter by two or three times, so it’s better to use a larger bowl right from the beginning (make sure you have it within reach, if otherwise).
Once you’re done with the whole process, you should store shea butter in a dark and cool place. Use a glass or plastic container. You don’t want to store it in the refrigerator though, as it may get grainy. You can store shea butter mixed with coconut/jojoba oil for at least 6 months.
Shea butter and coconut oil for hair growth
If you’re not sure where to begin with, when it comes to boosting the hair growth, here’s a great recipe that is going to work wonders not only for your hair, but also for your skin.
Here’s what you need for this recipe:
- ½ cup of raw shea butter
- 2 tablespoon of organic coconut oil
- 2 to 6 table spoons of castor oil
If you want to step up your game, you may also want to add:
- 5 drops of lemon grass essential oil
- 7 drops of rosemary essential oil
- 1 tablespoon of rose water
When you’re using raw shea butter, chances are it’s hard so you need to soften it a bit. You can simply place the shea butter jar in a bowl of hot water.
You need to make the shea butter creamy, so once it’s melted, use a hand mixer for 30 seconds and whip the shea butter. Not only the whipping is going to make the mix all fluffy and creamy, but it’s also going to ease up the blending of the ingredients.
Add the coconut oil and whip it for another 10 seconds, scraping the sides of the bowl with a plastic spatula. Continue with adding the other ingredients and the essential oils. Don’t forget to whip again for a minute or so, until all the ingredients are entirely incorporated.
Once the mix is ready, you can spoon it into a sterilized mason jar or a nice container. Store the mixture in a clean and dry place. Make sure it’s away from water or other possible contaminants.
Some tips may always come in handy, so take check the list down below:
- You don’t need a hand mixer as a small blender may work just as well.
- Don’t hesitate to experiment and add the essential oil that you like. Palm arose, geranium or lavender oil are also nice options for hair growth, blending just fine with shea butter.
African shea butter for hair
African shea butter is made by West African women in West Africa for generations. It’s a fundamental ingredient for cooking, but also for treating cold and flu. You can use it for protecting the sensitive skin of newborns and has nourishing abilities.
Both African and shea butter come from Africa, but African butter grows in the low lands, close to rivers. It’s also known as river butter. Shea butter grows in the highlands where it’s high and dry.
How to use African shea butter for hair
Made from the nuts of the shea-karate tree, African shea butter is loaded with fatty acids that have healing abilities. African shea butter is supposed to remain solid at room temperature, melting into your skin as it comes in contact with your body heat.
If you want to get the best out of the African shea butter, go with one that is less refined.
You don’t know how to use it for your hair? Here is one way to include in your hair care routine:
- Apply the African shea butter to your scalp so that you enjoy the benefits of a deep condition.
Make sure you only use your fingertips for massaging the shea butter into your scalp. Don’t forget about the nape of your neck, behind your ears or around your hairline.
- Massage the African shea butter for 10 minutes or so. You want to run the African shea butter through the hair ends. It’s better use a wide-toothed comb once you’re done with massaging
- Get a soft towel and wrap your hair in the towel. You may also use a plastic shower cap. The main idea is that you let the African shea butter work on your scalp for 10 more minutes.
- Don’t forget to rinse the African shea butter from your hair when time is done. Using cold water for rinsing is going to be better. You may continue with shampooing and conditioning your hair the way you typically do.
Cantu shea butter for natural hair
Specialized in creating various hair products, Cantu cosmetics is offering a great variety of shea butter products that take good care of textured hair.
Here are some of the most popular out there.
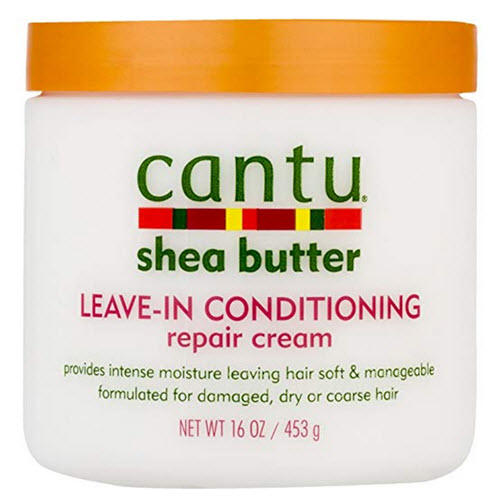
1. Able to repair the split ends and moisturizing the hair, the Cantu Shea Butter Leave-In Conditioning Repair Cream is a nice addition to one’s hair care regimen.
![]()
The leave-in conditioning cream is going to stop and repair the split ends, breakage and make the fragile hair stronger. Its formula is based on pure shea butter and various natural oils, which is why the repair cream deeply moisturizes the hair, leaving your hair soft and shiny. It helps you manage easier the hair for styling and smooths out the dry and course hair.
The formula is efficient on relaxed, texturized, colored and even permed hair. you may leave it overnight, covering your head with a plastic cap for deeper absorption and maximum conditioning.
The smell is amazing and the repair cream isn’t just for the curly hair. it eliminates tangles and it’s great to use when you’re transitioning.
Here’s what we like about it:
- It repairs the dry and damaged hair
- It eliminates tangles and split ends
- It’s good for all types of hair
- It smells amazing
We’re not backing down over some minor flaws:
- Some noticed it doesn’t mix that great with other products
- One may experience flakes if using too much of it
Stay focused on the positives, as they’re so many and give the Cantu leave-in conditioning repair cream a try when you want to repair your damaged hair.
2. One thing you can’t ever complain about when it comes to Cantu shea butter products is their price as they sure never break the bank. Far from being just another cheap hair product, the Cantu Shea Butter for Natural Hair Moisturizing Curl Activator Cream is actually going to smoothen and improve your natural curl pattern for just a few bucks.
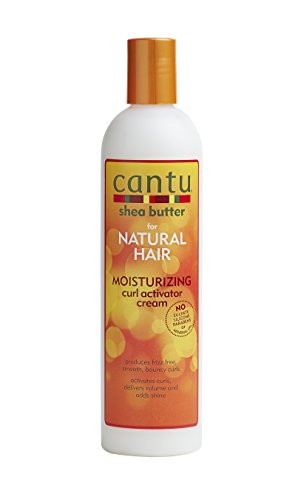
![]()
The curl activator cream is going to soften your curls, leaving them bouncy and nice throughout the whole day. It creates a frizz-free volume and it’s a solid option for a wash-and-go. it gives a healthy shine and a good hold to your curls.
Not only the formula includes shea butter, coconut oil, aloe Vera, sweet almond oil, avocado oil, mango seed butter, carrot seed oil, argan kernel oil and so many more, but it also doesn’t contain any sulfates, parabens, silicones, paraffin, propylene, phthalates or gluten. Going through the list of ingredients is going to help you get why the curl activator cream softens and gives a nice bounce to your curls. Sage leaf extract, grape seed extract, nettle extract, neem seed oil, olive fruit oil and macadamia seed oil complete the list of ingredients.
A little goes a long way and the cream is a leave-in product, not needing rinsing.
We’ve shorted the pros to the following:
- It creates a nice volume and gives the curls a healthy shine
- It defines the curls and gives them a nice bounce
- It provides a good hold for the curls
- It’s made with so many natural ingredients
Don’t let the minor problems change your mind:
- One may feel the formula a tad heavy for the hair
- It can leave a sticky feel
As the goods outweighs the bad, you shouldn’t sit on the fence and get the cream for a better definition and frizz-free volume for your hair.
3. If you’re looking for a curling cream that also moisturizes your hair, put your trust and faith in Cantu Shea Butter for Natural Hair Coconut Curling Cream.
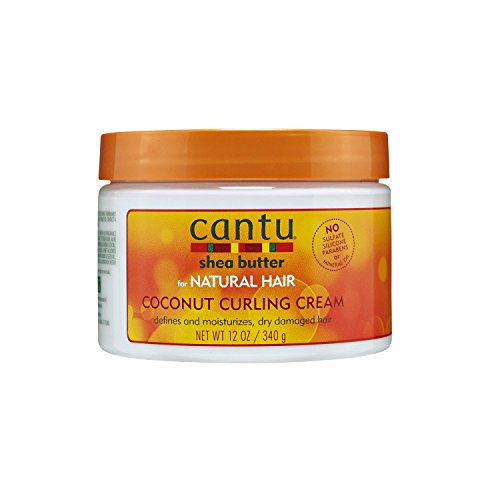
![]()
The cream is going to leave your curls soft, shiny and better defined and keeps your hair well moisturized for quite some time. The formula doesn’t contain any silicone, parabens, mineral oils, paraffin, phthalates, PABA or DEA. On the other hand, the formula includes several natural ingredients and listing them is going to take too much time. Here’s what you’re going to find on that list: shea butter, aloe Vera, sweet almond oil, jojoba seed oil, coconut oil, mango seed butter, neem seed oil, macadamia seed oil, honeysuckle flower extract, sea kelp extract, grape seed extract, sage leaf extract ad nettle extract.
One thing is sure; the cream has an amazing smell which may even feel overpowering to some. The cream is thick so it’s easy to apply, providing a nice slip. A little goes a long wat and the cream defines the curls so very nicely.
Let’s go over to good things once again:
- It’s thick and easy to apply
- It moisturizes the hair and defines the curls
- It has a good slip and an amazing smell
- It softens the curls, giving a nice healthy shine
The downsides aren’t deal breakers:
- One may feel the smell a bit overpowering
- It doesn’t dry that fast
Even if the curling cream isn’t all roses and rainbows, it’s still an affordable and reliable cream to use for moisturized definition for your curls.